Furniture Fit Calculator: Measure Before You Buy
A furniture fit calculator workflow to measure room before buying, answer will my sofa fit, and plan AI furniture placement.
Most furniture returns start the same way: a piece looked perfect online, arrived, and then did not fit through the doorway, overwhelmed the room once inside, or blocked the path to the kitchen. None of those are aesthetic problems — they are measurement problems, and they are entirely preventable with about fifteen minutes of work before you click buy.
Use this as a practical room measurement guide for the numbers that actually matter, the delivery-path step most buyers skip, and when an AI room tool helps versus when a tape measure is still faster.
The five measurements that decide fit
1. Room dimensions (not just wall-to-wall)
Start by sketching a rough top-down floor plan. Write the numbers directly onto the sketch as you measure:
- Length and width of each wall, measured at floor level (skirting board to skirting board, not wall to wall — usable floor space is what matters)
- Ceiling height in all four corners and center (older homes often have sloping ceilings; this affects tall wardrobes and display cabinets)
- Fixed obstacles: window positions and sill heights, radiator protrusion (a radiator that sticks out 6 inches / 15 cm changes how close furniture can sit), outlet locations, door swing directions
If the room is not perfectly rectangular, measure each wall separately and use the smaller number for planning. Overestimating space is far more expensive than underestimating it.
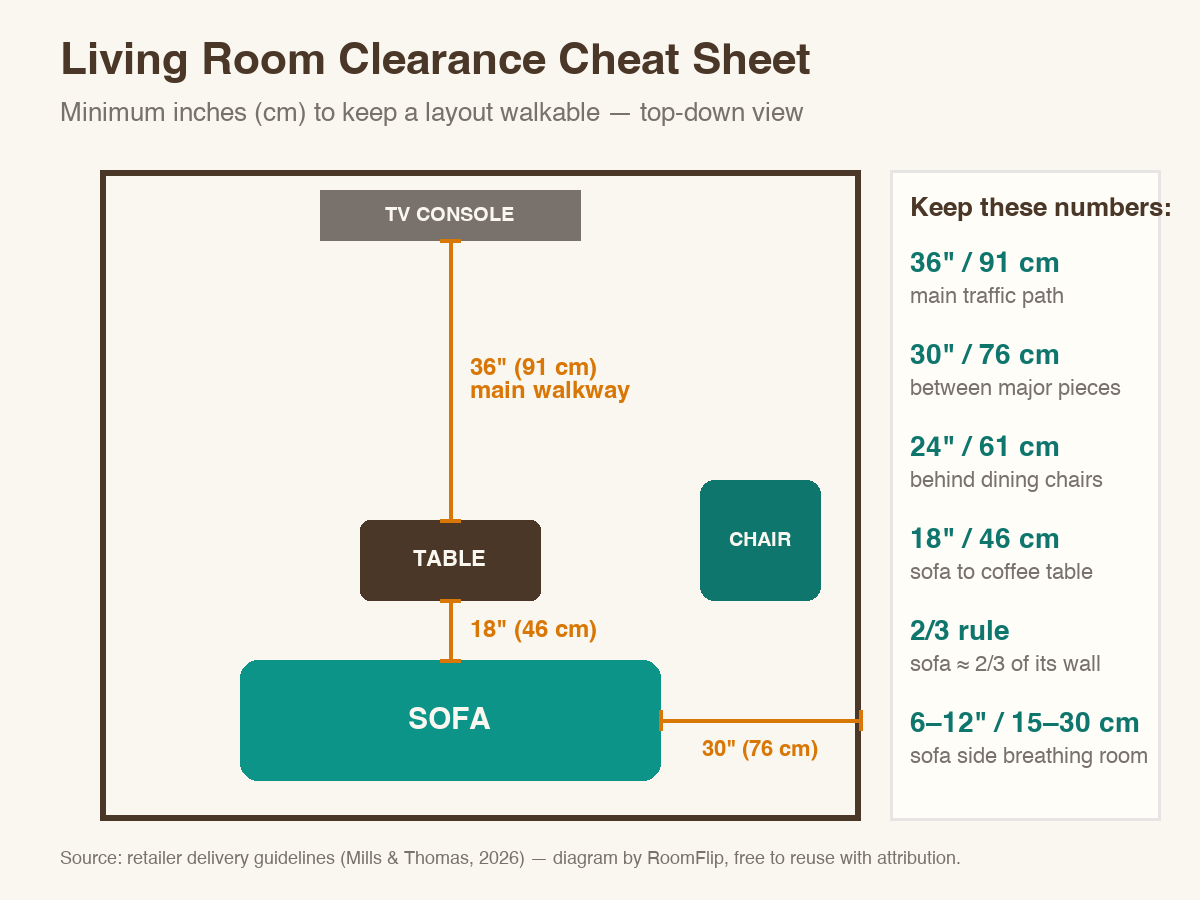
Figure 1: Top-down living room with standard clearance minimums. Source: retailer delivery guidelines consolidated from Mills & Thomas (2026), Coast Road Furniture (2026), and Adairs (2026). Diagram generated by RoomFlip editorial team.
2. Clearance rules (the numbers to memorize)
These are the minimum gaps that keep a layout functional rather than merely fitting on paper:
| Zone | Minimum gap | Why it matters |
|---|---|---|
| Main traffic path | 36 in / 91 cm | Anyone should walk past without turning sideways |
| Between major pieces (sofa to chair) | 30 in / 76 cm | Prevents the room feeling cramped |
| Behind dining chairs (pull-out) | 24 in / 61 cm | Chairs must fully extend without hitting the wall |
| Sofa to coffee table | 18 in / 46 cm | Close enough to set a drink down; far enough to walk past |
| Sofa side breathing room | 6–12 in / 15–30 cm | Space for end tables and air circulation |
| TV to nearest seat | 30+ in / 76 cm | Absolute minimum; comfortable viewing distance is usually further |
A useful proportion rule: a sofa looks balanced when its length is roughly two-thirds of the wall it sits against. A coffee table works best at about two-thirds of the sofa’s width. These ratios come from interior design proportion studies (Adairs, 2026) and are visible in professionally staged rooms because they create visual balance without requiring a designer’s eye.
3. The delivery path (the step most people skip)
A piece that fits the room can still fail to reach it. The path from the delivery truck to the final placement spot has four pinch points:
Front door: measure the clear opening width and height with the door fully open, not the frame dimension. If there is a storm door, measure the narrower of the two.
Hallway + turns: record width before and after each 90-degree turn. A straight hallway can look wide enough, but a corner stop is where most sofas get stuck. For apartment buildings, note lift (elevator) interior dimensions — many HDB lifts in Singapore, for example, have interior widths around 110–125 cm with door openings near 90 cm (Editions SG, 2026).
Stairs / elevator: stairwell width at the narrowest point (usually where the handrail mounts), landing depth, and ceiling height above each step. For elevators: door opening width, interior height, interior depth, and the diagonal of the elevator car.
Room doorway: the last door is frequently the narrowest. Compare its clear opening to the piece’s diagonal depth — the distance from the top-back of the frame to the bottom-front of the arm. Diagonal depth is a strong warning signal for tight turns, but it is not the only deciding number. Door height, sofa height, removable legs, and the amount of space available to rotate the piece can change the answer. If the diagonal depth exceeds the tightest opening on the path, treat it as a delivery risk that needs retailer confirmation before you order (The Spruce, 2026).
4. Unit conversion (the silent error)
Furniture listings use inches (US retailers), centimeters (European and Asian brands), or both. Measuring your room in feet, comparing to a product listed in inches, then checking another store in centimeters creates conversion errors that look small on paper but add up to inches in reality.
Quick reference: 1 inch = 2.54 cm exactly. Convert everything into one system before you compare. A sofa listed as 84 inches is 213.4 cm — and if your lift door is 90 cm wide, that comparison only makes sense once both numbers share a unit.
5. The footprint test (painter’s tape)
For larger purchases — sectionals, dining sets, sleeper sofas — mark the exact footprint on your floor with painter’s tape or masking tape before ordering. Walk around the outline. Sit where the sofa would sit. Imagine the coffee table in front of it.
This test takes ten minutes and prevents the single most common post-purchase surprise: “it fits numerically but the room feels wrong.” Retailers consistently report that taping the footprint eliminates the majority of return trips caused by scale misjudgment (Mills & Thomas, 2026; Hampson & Co, 2026).
How architects approach layout differently
Most measuring guides start with the room dimensions and end with the furniture specs. Architects tend to invert that sequence: they map circulation paths first, then place furniture in the remaining pockets of undisturbed space.
Interior architect baixu (297K YouTube subscribers) describes this as the “desire path” method — the same concept landscape designers use when noticing worn trails in grass that diverge from the paved walkways. In a home, people naturally move along certain routes (entry to kitchen, hallway to living area). Furniture placed across those routes creates friction: people squeeze past, bump knees, and the seating never feels comfortable even if the dimensions technically work (baixu, October 2025).
The practical workflow derived from this approach:
- Trace the paths people will actually walk through the room
- Identify pockets of space where foot traffic does not naturally go — these are your safe zones for furniture
- Place the largest piece (usually the sofa) in the biggest undisturbed pocket, aligned to a strong axis (fireplace, central window, or ceiling fixture)
- Anchor secondary pieces (coffee table, armchair) relative to that primary placement using the clearance numbers above
This method produces layouts that feel intuitive to move through because the furniture respects how the space is already used, rather than forcing people to adapt to an arbitrary arrangement.
When AI room tools help (and when they do not)
AI-powered room planners fall into two categories, and mixing them up wastes time:
| Tool type | What it does well | Accuracy caveat |
|---|---|---|
| AR room scanners (Magicplan, etc.) | Generate a 2D floor plan from pointing your phone at corners | LiDAR accuracy varies by phone model; always verify critical dimensions with a tape measure |
| Photo-to-style tools (RoomFlip, Remodel AI, etc.) | Show how your actual room looks with different furniture styles and finishes | Preserve your real walls and windows; do not produce measured floor plans |
| Drag-and-drop planners (Planner 5D, RoomSketcher) | Draw scaled layouts with real furniture dimensions | Time-intensive (10–20 minutes per room); generic item sizes may not match your specific piece |
For the specific question “will this piece fit?”, the workflow that catches the most errors is: tape measure + sketch + painter’s tape test + AI style check. The AI step answers “does it look right?” after the manual steps answer “does it fit?”
To run the room numbers quickly, RoomFlip’s free furniture fit check takes the room length and width, the piece’s length and depth, and the walkway you want to keep, then estimates whether the layout stays workable. It does not check doorways, stairs, or the delivery path, so measure those separately.
RoomFlip’s own try furniture in room tool lets you upload a photo of your room and test furniture placements visually, which is useful for confirming that a piece that passes the numbers also passes the eye test before you commit to purchase.
Common mistakes that survive the measuring process
Even careful measurers hit these traps:
- Measuring total wall length instead of free wall length — a window or kitchen opening halfway across the wall reduces usable space. Only the uninterrupted segment counts.
- Forgetting functional clearance — a wardrobe that fits the wall width cannot open its doors if you leave zero depth in front of it.
- Assuming the room is rectangular — older homes often have walls that differ by several inches from one end to the other. Always use the smaller measurement.
- Trusting app measurements over a physical tape — laser measures and AR scanners are fast for room dimensions, but a metal tape measure remains more reliable for furniture edges and curved shapes (Coast Road Furniture, 2026).
- Checking the room but not the path — the majority of delivery failures involve hallways, stairwells, and elevators, not the destination room itself (Povison, 2026).
Quick pre-buy checklist
Save this list on your phone and run through it before any furniture purchase over $200:
- Room length, width, and ceiling height recorded (smallest measurement used)
- All fixed obstacles marked (windows, doors, radiators, outlets)
- Main walkway cleared to 36 in / 91 cm minimum
- Delivery path measured: front door, hallway turns, stairs/elevator, room doorway
- Diagonal depth of large pieces compared to tightest path opening
- All dimensions converted to one unit system
- Painter’s tape footprint tested (for sofas, sectionals, dining sets)
- Drawer/door swing and recliner extension clearance verified
- Radiators and vents not blocked by planned placement
Fifteen minutes of measuring beats two hours of return coordination, a restocking fee, and the disappointment of a room that almost worked.